
Standing Balance Test Calculator
Quick Answer
The Standing Balance Test measures your ability to maintain single-leg balance, a critical indicator of athletic performance, injury risk, and overall health. Use our calculator to compare your results against age and sport-specific standards.
- Young adults should achieve 43-45 seconds (eyes open), 15 seconds (eyes closed)
- Scores below 10 seconds predict 2.5x higher ankle sprain risk in athletes
- Elite athletes typically achieve 45-60 seconds eyes open, 15-20 seconds closed
Understanding the Standing Balance Test
This is a simple yet highly effective balance test that can be modified to suit your situation and athletic needs. The test involves standing on one leg for as long as possible, providing valuable insights into your neuromuscular control, proprioception, and injury risk. Research has shown this test to be a reliable predictor of both athletic performance and health outcomes across all age groups.
The standing balance test is used extensively in sports medicine, from professional team assessments to rehabilitation settings. Athletes who cannot maintain single-leg balance for at least 10 seconds face significantly higher injury risks, particularly for ankle sprains and ACL injuries. See also the flamingo and stork balance tests, which also assess balancing on one leg but with different protocols.
Test Purpose and Athletic Applications
Test purpose: to measure whole body balance, assess static postural control, and identify athletes at increased risk for lower extremity injuries
Balance testing is crucial for athletes across all sports because nearly every athletic movement requires some degree of single-leg control. When you run, you're essentially performing a series of single-leg balances at high speed. When you cut, pivot, land from a jump, or even walk up stairs, your body must control itself on one leg. Athletes with poor single-leg balance demonstrate:
- 2.5 times higher risk of ankle sprains (Trojian & McKeag, 2006)
- Increased likelihood of ACL injuries and knee problems
- Reduced agility and movement efficiency
- Compromised ability to generate and transfer power
- Higher energy expenditure during dynamic activities
Equipment Required and Test Setup
Equipment required: flat, non-slip surface, stopwatch, recording sheet
The beauty of this test is its simplicity. Unlike many fitness assessments requiring specialized equipment, the standing balance test needs only a stopwatch and a safe testing area. This makes it ideal for:
- Pre-season athletic screening programs
- Return-to-sport assessments after injury
- Home fitness monitoring for athletes
- Team-wide baseline testing at minimal cost
- Regular progress tracking throughout training cycles
Pre-Test Procedures
Pre-test: Explain the test procedures to the subject. Perform screening of health risks and obtain informed consent. Prepare forms and record basic information such as age, height, body weight, gender, test conditions. Perform an appropriate warm-up. See more details of pre-test procedures.
Proper preparation ensures valid, reliable results and athlete safety. Athletes should remove their shoes to eliminate any balance assistance from footwear. The testing surface should be level and free of obstacles. Have a chair or wall nearby for safety, though the athlete should not use these for support during the test. Allow athletes 1-2 practice attempts to familiarize themselves with the protocol before recording official scores.
Test Procedure and Protocol
Procedure: The aim of the test is for the participant to stand on one leg for as long as possible. Give the subject a minute to practice their balancing before starting the test. When ready, they lift one foot off the ground, and the timing starts. The timing stops when the elevated foot touches the ground or the person hops or otherwise loses their balance position. The best of three attempts is recorded. Repeat the test on the opposite leg.
Detailed Protocol Steps:
- Starting Position: Athlete stands with feet together, hands on hips, looking straight ahead at a fixed point on the wall
- Initiation: On command, athlete lifts one foot off the ground (whichever leg feels more comfortable initially)
- Timing: Start stopwatch when foot leaves the ground; stop when any of the following occurs:
- Elevated foot touches the ground or the standing leg
- Hands leave the hips
- Standing foot moves position or athlete hops
- Maximum time of 2 minutes reached (for safety)
- Recording: Note the time and any observations about balance strategy or compensations
- Repetition: Allow 30-60 seconds rest, then repeat for total of 3 trials per leg
- Scoring: Use the best time of three trials for each leg
- Eyes Closed Variation: After completing eyes-open trials, repeat the protocol with eyes closed (much more challenging)
Scoring and Interpretation
Scoring: time the total length of time person can stay in the balance position
The standing balance test provides quantitative data that can be compared against established normative values. Our calculator above provides age-adjusted interpretations, but here are general guidelines based on current research:
Normative Standards (Eyes Open)
| Age Group | Excellent | Good | Average | Needs Work |
|---|---|---|---|---|
| 18-39 years | 45+ sec | 35-44 sec | 25-34 sec | <25 sec |
| 40-49 years | 42+ sec | 32-41 sec | 22-31 sec | <22 sec |
| 50-59 years | 40+ sec | 30-39 sec | 20-29 sec | <20 sec |
| 60-69 years | 32+ sec | 22-31 sec | 15-21 sec | <15 sec |
Note: Athletes should typically score in the "Good" to "Excellent" range for their age group.
Sport-Specific Applications
Different sports place varying demands on balance, and optimal balance times reflect these sport-specific requirements:
⚽ Soccer
Target: 50+ seconds eyes open, 15+ seconds closed
Why it matters: Soccer involves constant single-leg actions—kicking, cutting, landing from headers, and rapid direction changes. Elite players demonstrate superior balance to maintain control while manipulating the ball.
Training focus: Single-leg ball control drills, cone weaving on one foot, goalkeeper-specific balance work
🏀 Basketball
Target: 50+ seconds eyes open, 15+ seconds closed
Why it matters: Layups, jump shots, defensive slides, and rebounding all require exceptional single-leg control. Poor balance correlates with increased ankle and knee injury rates.
Training focus: Single-leg jump shots, defensive slide-to-hold drills, single-leg box jumps
🤸 Gymnastics
Target: 60+ seconds eyes open, 20+ seconds closed
Why it matters: Beam work, floor routines, and apparatus skills all demand exceptional balance. Gymnasts often need to maintain perfect balance under extreme positions and with eyes focused on distant targets.
Training focus: Beam walking progressions, handstand holds, single-leg turns, proprioceptive training
🏃 Running
Target: 45+ seconds eyes open, 15+ seconds closed
Why it matters: Running is a series of single-leg balances performed rapidly. Better balance improves running economy, reduces injury risk, and enhances trail running performance.
Training focus: Single-leg deadlifts, post-run balance holds, trail running, hill repeats with focus on landing control
Variations and Modifications
Variations / modifications: to increase the degree of difficulty, the test can be conducted with the person having their arms either by their sides, across their chest, held out horizontally, or on their head. You could make the subject stand on their toes or not. You could also conduct the test with their eyes closed for each of these variations too.
The standing balance test's simplicity makes it highly adaptable to different athletic populations and training phases:
Progressive Difficulty Levels
- Level 1 - Basic: Eyes open, hands on hips, flat foot (standard test)
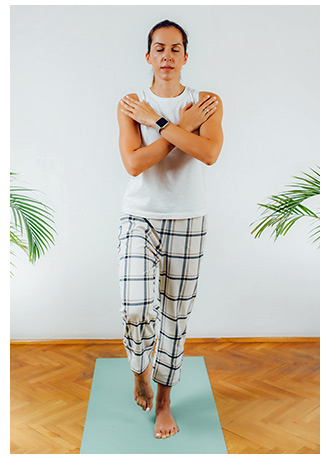
- Level 2 - Intermediate: Eyes open, arms crossed over chest or extended
- Level 3 - Advanced: Eyes closed, hands on hips (dramatically reduces visual input)
- Level 4 - Elite: Eyes closed, arms crossed, or standing on toes
- Level 5 - Extreme: Unstable surface (foam pad, BOSU ball), eyes closed
Sport-Specific Variations:
- Soccer players: Balance while juggling a ball, single-leg stance on small platform
- Basketball players: Balance while holding ball in shooting position overhead
- Football players: Balance while in athletic stance, reacting to coach signals
- Runners: Single-leg balance after fatiguing run to assess control when tired
How to Improve Your Standing Balance
If your test results indicate below-average balance performance, implementing a structured training program can produce significant improvements within 4-8 weeks. Research shows balance is highly trainable at all ages, with consistent practice yielding measurable gains.
Progressive 8-Week Balance Training Program
Weeks 1-2: Foundation Phase
- Daily practice: 3 sets of 30-second holds per leg (eyes open, near wall)
- Frequency: 5-7 days per week
- Focus: Achieving stable, controlled stance without wobbling
Weeks 3-4: Development Phase
- Increase hold times to 45-60 seconds
- Add arm movements (circles, overhead reaches) during balance
- Practice 2-3 times with eyes closed for 10-15 seconds
Weeks 5-6: Challenge Phase
- Progress to unstable surfaces (foam pad, pillow)
- Incorporate sport-specific movements while balancing
- Increase eyes-closed time to 20-30 seconds
Weeks 7-8: Integration Phase
- Combine balance with functional movements (single-leg squats, reaches)
- Practice after training when fatigued (most relevant for sports)
- Challenge with external perturbations (partner applying light pushes)
Daily Balance Training Opportunities:
- While brushing teeth (2 minutes twice daily = 28 minutes weekly practice)
- During TV commercials or between episodes
- Waiting for coffee to brew or microwave to finish
- Standing in line at stores or events
- As part of warm-up and cool-down for all training sessions
Frequently Asked Questions
How long should I be able to balance on one leg?
For young adults (18-39 years), you should be able to balance for 43-45 seconds with eyes open and 15 seconds with eyes closed. This decreases with age—60-69 year olds typically balance for 30-32 seconds eyes open and 4 seconds eyes closed. Athletes should aim for performance in the "good" to "excellent" range for their age group, which often means 45-60 seconds eyes open.
What does it mean if I can't balance on one leg for 10 seconds?
Inability to balance for 10 seconds indicates significantly increased injury and health risks. Research by Trojian and McKeag (2006) found athletes who cannot balance for 10 seconds have 2.5 times higher risk of ankle sprains. In older adults, scores below 10 seconds predict increased fall risk and are associated with higher mortality risk over the next decade. You should consult a physical therapist or healthcare provider for proper assessment and training.
Is it normal for my balance to be worse with eyes closed?
Yes, it's completely normal for eyes-closed balance to be significantly worse than eyes-open performance. Typically, eyes-closed balance is only 30-40% of your eyes-open time. This occurs because you lose visual input and must rely entirely on your vestibular system (inner ear) and proprioception (body position sense). Eyes-closed testing provides valuable information about these systems specifically.
How can I improve my balance for my sport?
Practice single-leg balance 3-4 times per week for 10 minutes. Start with eyes-open holds near a wall, gradually progressing to eyes-closed and unstable surfaces. Incorporate sport-specific variations—soccer players should practice while juggling, basketball players while holding shooting position, runners after fatiguing workouts. Increase difficulty by 5 seconds weekly. Yoga, tai chi, and functional strength training (single-leg deadlifts, squats) also improve balance effectively.
Does balance predict athletic performance?
Yes, balance is a strong predictor of athletic performance across most sports. Good single-leg balance indicates proper neuromuscular control, which translates to better agility, more efficient movement patterns, improved power transfer, and reduced injury risk. Balance testing is standard at NFL and NHL combines. Research shows direct correlations between balance test performance and sport-specific skills like cutting speed, vertical jump, and sprint times.
Which leg should I test first?
Test both legs and record each result separately. Most people have a dominant leg (usually the leg they kick with) that may perform slightly better. However, significant differences between legs (more than 5-10% variance) can indicate imbalances that should be addressed through training. For athletic populations, aim for relatively symmetrical performance between legs to reduce injury risk.
When should I retest my balance?
Retest every 4-8 weeks if actively training balance. Test before and after injury rehabilitation. Include balance testing in pre-season athletic screening and post-season assessments. After implementing a balance training program, retest after 4-6 weeks to measure progress. Avoid testing when fatigued unless specifically assessing post-exercise balance control.
Scientific References
- Springer, B. A., Marin, R., Cyhan, T., Roberts, H., & Gill, N. W. (2007). Normative Values for the Unipedal Stance Test with Eyes Open and Closed. Journal of Geriatric Physical Therapy, 30(1), 8–15.
- Trojian, T. H., & McKeag, D. B. (2006). Single leg balance test to identify risk of ankle sprains. British Journal of Sports Medicine, 40(7), 610-613.
- Araujo, C. G., De Souza E Silva, C. G., Laukkanen, J. A., et al. (2022). Successful 10-second one-legged stance performance predicts survival in middle-aged and older individuals. British Journal of Sports Medicine, 56(17), 975–80.
- Kaufman, K. R., et al. (2024). How long a person can stand on one leg is a more telltale measure of aging than changes in strength or gait. PLOS ONE.
- Vellas, B. J., Wayne, S. J., Romero, L., et al. (1997). One-leg balance is an important predictor of injurious falls in older persons. Journal of the American Geriatrics Society, 45(6), 735–8.
- Bressel, E., Yonker, J. C., Kras, J., & Heath, E. M. (2007). Comparison of Static and Dynamic Balance in Female Collegiate Soccer, Basketball, and Gymnastics Athletes. Journal of Athletic Training, 42(1), 42–46.
- Plisky, P. J., Rauh, M. J., Kaminski, T. W., & Underwood, F. B. (2006). Star Excursion Balance Test as a predictor of lower extremity injury in high school basketball players. Journal of Orthopaedic & Sports Physical Therapy, 36(12), 911-9.
- Riemann, B. L., & Schmitz, R. J. (2012). The relationship between various modes of single leg postural control assessment. International Journal of Sports Physical Therapy, 7(3), 257-266.
Similar Balance Tests
- Stork Balance Test — stand on the toes of one leg for as long as possible with the free leg resting on the inside of the opposite knee
- One Leg Stand — the US sobriety test, stand with one foot off the ground for 30 seconds
- Flamingo Balance Test — stand on one leg while balancing on a beam
- Stick Lengthwise Test — balance on a stick for as long as possible, standing side-on on the balls of both feet
- Y Balance Test — dynamic balance test using reaching movements in multiple directions
Related Pages
Balance Tests
Complete collection of balance assessment protocols for athletes and fitness testing
Learn More →Fitness Testing Guide
Comprehensive guide to conducting, recording, and interpreting fitness test results
Learn More →